Saturday, April 28, 2012

Broiled Salmon with Creamy Dill Sauce

One of our favorite recipes is this broiled salmon with creamy dill sauce recipe (that Steve received from a colleague at work). The recipe is incredibly simple and takes less than 20 minutes to prepare - great when we are pressed for time and are looking for a healthy meal.


Here are the ingredients you will need:
  •  2 boneless, skinless salmon fillets
  • 1/2 cup light sour cream
  • 2 tablespoons pure maple syrup
  • 1 tablespoon Dijon mustard
  • 1 tablespoon lemon juice
  • 1 tablespoon minced fresh dill
  • 1 teaspoon grated lemon zest
  • 1/2 teaspoon each salt and pepper
And here is how you bring it all together:
  • Preheat broiler. Sprinkle salmon fillets lightly on both sides with salt and pepper.
  • Place salmon on a baking sheet that has been sprayed with cooking spray. Broil 4-6 inches from the heat source for about 4 minutes per side, or until fish flakes easily but is just slightly pink in the center.
  • Wile fish is cooking, prepare sauce. In a small bowl, whisk together sour cream, maple syrup, mustard, lemon juice, dill, lemon zest, salt and pepper.
  • Remove salmon from oven and drizzle with sauce. Serve immediately.

The sauce is really what makes this dish stand out - the combination of the maple syrup, Dijon mustard, lemon and dill are incredible! If you enjoy salmon and are looking for a quick meal idea I suggest that you move this recipe to the top of your list.

Bon appetit and enjoy!

Halifax Club Cooking Classes

Some of you may know that I am a member of the Halifax Club and recently have been elected to the Board of Directors (as of November 2011). As a Board member I am always trying to share with friends, family and colleagues what the Club has to offer and one of the unique offerings are the monthly cooking classes with the Executive Chef.

Over the last year I have attended a number of the cooking classes, everything from Italian to French to Thai this past month. Each time I attend a cooking class I get to meet so many wonderful people (some are members and some have simply heard about the class and wanted to try it for themselves), have the opportunity to cook in a great kitchen with amazing tools and resources, learn new recipes, and share a great meal with wonderful people (and the best part is that I don't have to do any dishes after!).

The April cooking class had a Thai theme (each cooking class has a theme that the recipes will focus around) and also had an elevated experience. One of the thoughtful and attentive staff members created a concept of incorporating more elements of the theme into the event, to enhance the experience for all of the participants. This month's class also featured Thai music, cocktails, decorations and ambiance - it was wonderful. This enhanced experience will also be continuing through an upcoming series of meals and cooking classes featuring an 'around the world' experience. Both Steve and I are looking forward to participating in as many of these events as possible, and encourage you to attend as well if this may be something that interests you (I believe that the next cooking class, in May, will be Greek).

Steve and I both had a phenomenal time at the Thai cooking class and learned many new recipes. The dish that we prepared was an eggplant curry that was delicious (each couple/team/group of friends or new acquaintances prepares a different dish and then we all sit down to enjoy them together at the end of the evening). We are hoping to find a good opportunity in the coming weeks to try some of the Thai recipes we learned (and were able to take home with us - the Club provides each participant with a complete book of all the recipes used in the cooking class) in our own home and perhaps share them with friends and family.

If you are interested in learning more about the cooking classes or the Halifax Club please message me - I would be delighted to share with you what all the Club has to offer.

Friday, April 27, 2012

Pineapple Pork Chops

 I love pork chops! And I always like to find new recipes for them, which lead me to finding the pineapple pork chop recipe and trying it. Although I love pork chops, I am not a big fan of the texture of pineapples but do like the flavour (so needless to say, I pass along the actual pieces of pineapple to Steve's plate - and to my Dad who also received a gift Tupperware package of this delectable dish).


I found this recipe on Allrecipes.com and only made a few slight adjustments. The quantities that I used are listed below:

  • 1 tablespoon olive oil
  • 2 boneless pork chops (each portion was very large and was able to feed 3 adults!)
  • 1 can chicken broth
  • 2 tablespoons soy sauce
  • 1 tablespoon vinegar
  • 2 tablespoons brown sugar
  • 2 tablespoons cornstarch
  • 1 can of pineapple juice with pieces (place the pineapple pieces on the pork chops when the recipe is complete)

And here is how we brought it all together:
  1. Heat the olive oil in a frying pan over medium heat, and brown the pork chops about 5 minutes on each side. Remove chops from the skillet, and set aside.
  2. Mix the chicken broth, soy sauce and vinegar into the frying pan, and bring to a boil. Return the pork chops to the skillet, reduce heat, and simmer 20 minutes, to an internal temperature of 160 degrees F (70 degrees C). Remove chops from the frying pan, reserving broth mixture, and set aside.
  3. In a bowl, blend the brown sugar, cornstarch, and pineapple juice. Mix into the frying pan with the chicken broth mixture. Bring to a boil. Serve with the cooked pork chops.
This recipe was easy to follow and did not take too long to make. The only obstacle I faced was that the pork chops that I was using were strangely large and therefore took longer to cook throughout. I also chose to place the pineapple pieces over the cooked pork chops and sauce - both Steve and my Dad liked that part!

I would recommend that you try this recipe if you are a pork chop and pineapple fan - or if you want to alter the recipe you could easily switch out the pork chops for chicken.

Bon appetit and enjoy!

Monday, April 16, 2012

Homemade Sushi!

We finally took the leap and made our own sushi. Steve and I have been enjoying sushi for maybe two years now and have really enjoyed the experience and the food, but we have been toying with the idea of making our own for about 8-9 months. We had heard from friends, family and blogs that it can be really easy, but we had our doubts.

This past weekend we celebrated our anniversary and wanted to do something different for our anniversary supper and instead of going out we decided to take the leap and make our own sushi.

We went to Sobeys on the weekend and bought everything we thought that we would want (we are just sushi-beginners so our attempts and tastes may seem calm, but it was a big step for us). We bought the bamboo sushi board/roller, sticky rice, rice paper (we do not like the seaweed option), salmon, cucumber and carrots. And to ensure we didn't go into this dinner blind we did choose to watch a few youtube videos on how to properly lay out the rice/salmon/veggies, how to roll it and how to cut it. After about 10 minutes of watching videos we felt well enough prepared to start trying it ourselves.

We began by Steve making the sticky rice and me cutting up the cucumbers and carrots.


Then we started to prepare the rice paper by dampening a cloth/paper towel and placing the rice paper inside for about a minute. We found it worked best to gently press on the damp cloth/paper towel while the rice paper was inside. Once the rice paper was ready we placed it onto the bamboo board/roller and began to place the sticky rice over it (leaving a 1.5 cm space at the top of the rice paper to allow for the roll to seal). Note - the sticky rice is very sticky! make sure you have a bowl of water/sink near by to clean off your hands in the process.  Once we had the sticky rice placed over the rice paper we began to add the salmon, cucumber and carrots.


After laying out the rice, salmon, cucumber and carrots we began to roll it up. We gradually rolled and tucked, about 4 or 5 times until we came to the end of the rice paper (the part that we had left clear of sticky rice). To make the ends of the rice paper come together well we did one final roll and tuck and then slowly began to pull the bamboo board/roller away from the sushi; which resulted in a perfect roll every time (we were very surprised by this. Then we moved the roll over to a cutting board, grabbed a very sharp knife, wet the knife, cut the roll in the center, wet the knife again and cut each half of the roll into another half. Each full roll resulted in 6 pieces of sushi. And here is our final result:


We made about 40 pieces of sushi in total, we ate half for supper and Steve took the remaining half into work today for lunch and to share with others.

We had a great first experience making sushi and cannot wait to try it again! If you like sushi I highly recommend you try making your own - such a rewarding experience!

Bon appetit & enjoy!

Beef Stir Fry

After a long week of work, Steve and I looked for a quick meal on Friday night and we landed on beef stir fry. This meal requires no recipe for us because we make it all the time and tend to slightly switch it up.

Our constants are:
  • minute rice
  • beef strips
  • peppers

Our variables are:
  •  Which VH sauce we will choose.
    I don't think we have tried any that we don't like but we know that each one is different than the others and they are delicious!
  • Additional veggies. Sometimes we add carrots and broccoli. And sometimes Steve just adds everything (he is a less 'selective' eater than me)
We decide who is going to do which task to get started - someone needs to cook the meat and someone needs to cut up the veggies (it's pretty much assumed that Steve will be attentively cooking the meat and I will love every moment of precisely cutting every veggie for the dish). Steve then mixes all of the veggies and sauce in with the beef and I usually start to make the minute rice. And in about 5 minutes we are all set to eat.

It is relatively cheap (especially because Sobeys has the beef strips on sale right now), it is quick to make and it is so delicious!

In an efforts to expand our culinary world, let us know what you add to your stir fry - we'd love to give your recipes a try!

Bon appetit and enjoy!

Tuesday, April 10, 2012

Easter Dinner 2012

This year Steve and I decided to have Easter dinner at our home and invite my family over. This was the first time that we hosted a holiday dinner, cooked this many dishes and had this many people over for dinner (we have cooked for 16 people before, but that is only at our monthly cooking classes at The Halifax Club).

We began planning for the dinner about 2 weeks ahead of time because we really wanted to make it the best we could. I started by buying some Easter decorations for the house and Steve started reviewing websites, blogs, magazines and cookbooks for possible Easter dinner recipes.


One of my favorite decorations for the table was our bunny napkins. I found this idea/decoration on Martha Stewart's website and thought it should be pretty easy - I just needed to go out any buy linen napkins. The napkins were fun to make and really helped make the table look complete.


Here is the menu that we created:

Appetizer:
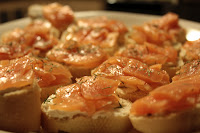
  • Smoked Salmon with Cream Cheese on Baguettes

    This is a quick and tasty appetizer that I make frequently (sometime just for Steve and I to snack on). I just buy a package of smoked salmon from Sobeys, a tub of whichever cream cheese I'm in the mood for (chive and onion is always good), and a french baguette. I cut the baguette into 1/2" slices, spread on the cream cheese (as much or as little as I like) and then top with 1" slices of smoked salmon. This used to be the point where I would then serve/eat the appetizer, but I started to add dill to each one and it was delicious - I would definitely recommend doing this added touch.


Main Course:

  • Balsamic Maple Glazed Ham
  • Balsamic Glazed Carrots
  • Green Bean Casserole
    Note - I substituted the Cream of Mushroom Soup for Cream of Chicken - it was delicious!
  • Creamy Chive & Onion Sweet Potato Mash with Pecan Topping
  • Creamy Herb & Garlic Mashed Potatoes
    This is my own recipe. I used 3 large yellow potatoes, cut them into 1" chunks and placed them in the steamer for about 20 minutes. When the potatoes are ready to be removed from the steamer I place them in a saucepan over a medium heat and mash them, adding milk and cream cheese (I used herb & garlic) until they are the consistency I am looking for. It's very simple but very satisfying.


Dessert:
  •  Creamy Layered Lemon Squares

  • Chocolate Bunnies
    On my trip to Vancouver I visited Granville Island's public market and stopped into the ChocolaTas store. I picked up a package of 3 chocolate bunnies for each person that would be at the dinner (5 in total) and placed them at each person's place setting. The bunnies were a great hit and were delicious!

The meal was delicious and the flavors all worked well together (something that we tried to be intentional about when we were selecting all of the dishes).

I am not always the biggest fan of sweet potatoes, but the recipe we used worked really well and had a variety of flavors which made it great. We found this recipe when we were looking through the Sobey's Inspired magazine. My Dad really loves sweet potatoes so we wanted to make them for the dinner because he was coming over, but we also wanted to put our own spin on it - everyone was really pleased with this dish.

The green bean casserole was something I remembered seeing on TV commercials for many years but never had the urge to make it until this year. The casserole was extremely easy to make (just opening cans, mixing ingredients and baking in the oven). This was a great creamy and crunchy (because of the French's fried onions) dish - everyone really liked this one too - none of us had tried it before.

The carrots were a simple compliment to the ham, as both of them had balsamic vinegar tastes. And of course the ham was the main feature. Steve found the recipe for it and spent some time in the days leading up to Sunday looking at a variety of tips and videos to gain insight into how to cook the perfect ham. All of Steve's hard work paid off because the ham was juicy and had a wonderful flavor!

The dessert was not like anything I had ever made before but I was eager to try it (Steve was really excited for this one!). We decided to make it the day before to ensure that it would be settled when for the next day (it has Jello in it). It was a great Easter dessert because it was light and the strawberries were a nice hint at spring/summer.

Overall I loved every single dish that we made and I would make all of them again! It was a great day of cooking and family - thank you to my Dad, brother and my brother's girlfriend for coming over and sharing the holiday with us!

I hope everyone enjoyed their Easter weekend and will try some of these dishes at their future holidays dinners. Bon appetit and enjoy!

Monday, April 9, 2012

Chicken with Cheddar Broccoli Sauce

I'm back from Vancouver and have had a great weekend getting back into the swing of things in the kitchen. I arrived home on Thursday night and didn't quite feel like cooking so we held off until Friday night. On Friday night we wanted to make a really simple but delicious dish for our first meal back together again (I felt like I was away from Halifax for an eternity - loved the trip, but I do love Halifax more!). We landed on a Campbell's recipe - Chicken with Cheddar Broccoli Sauce.


This recipe was really easy to make and was delicious! If you like cheesy sauces this one is a definite try! Here are the ingredients you will need to bring it all together:

  •  1 lb (454 g) boneless, skinless chicken breasts, cut into 4 portions (we cut this down to 2 chicken breasts because we were just making it for ourselves - we did not alter the other ingredients, so it just left us with lots of sauce - never a bad thing!) 
  • 1 can (284 ml) Campbell's condensed cream of broccoli soup
  • 1/4 cup (60 ml) orange juice (we did not have orange juice
    so we used Five Alive and it worked great)
  • 2 tbsp (30 ml) water
  • 1 cup (250 ml) chopped broccoli florets
  • 1/4 cup (60 ml) shredded cheddar cheese
  • 2 cups (500 ml) instant rice (the original recipe calls for brown rice, but we used white rice)

And here is how you bring it all together:
  1.  Cook chicken well in large non-stick skillet at medium-high heat. Remove chicken and keep warm. Reduce heat to medium.
  2.  Combine soup, orange juice, water, broccoli and cheese in same skillet. Heat to a boil, stirring often. Reduce heat to low.
  3.  Cover and simmer for 3 minutes, stirring often. Return chicken to skillet and heat through. Serve chicken with sauce and rice. 
This was a great dish and we have added to the stack of recipes that we want to try again soon - we hope you'll try it too! Bon appetit and enjoy!