Tuesday, December 11, 2012

Homestyle Chicken & Rice Soup

Over the past few months I have been trying out various soup and stew recipes. One that I have been keen to try to a chicken soup. So the other week I was looking through our cupboards and trying to decide what to make for supper. I noticed that we had lots of rice and chicken and decided that I would finally try to make my own chicken soup (with rice!).

I needed a recipe fast so I went straight to the Ben's website and looked for a chicken and rice soup recipe - and luckily they had one. I quickly scanned through the recipe and confirmed that I would be able to make this dish (looking back I wish I would have looked a little closer at how much the recipe would make - Steve and I ended up eating the leftovers for days!).

To view all of the ingredients for the recipe and how to bring it all together, visit the Uncle Ben's website and if the recipe does not instantly come up just search for 'Homestyle Chicken & Rice Soup'.

The soup was great when I ate it right away; however, when I came back to it a little while later to put the leftovers in the fridge I noticed that all of the broth was gone and I basically just had rice with chicken and vegetables (and lots of it!). So to counteract this, anytime Steve and I wanted to eat some of the leftovers we would just add a little bit of water and chicken broth and turn it back into soup.

I'll need to find another recipe (or some kitchen tricks) to help make a soup with rice in it better for the next time. If you have suggestions on how to avoid this kitchen flaw please let me know!

Friday, December 7, 2012

Creamy Chicken Florentine

If you haven't noticed yet, many of our weeknight recipes are chicken (and many are in creamy sauces!). So keeping with that trend Steve and I tried our hands at a new creamy chicken recipe - this time a Florentine.

Steve found the recipe on the Kraft Foods / Kraft Canada website. When Steve first looked over the recipe he thought that we would not need to adjust it at all, but when I took a look at it I suggested we swap out the spinach for broccoli (I am not a big spinach fan). And I was happy to see that even the website recommends that as a possible substitute!

Here are the ingredients that you will need for this recipe:
  •  3 cups penne pasta, uncooked 
  •  1 Tbsp. oil
  •  1 lb. (450 g) boneless skinless chicken breasts, cut into strips 
  •  1 orange pepper, cut into strips 
  •  4 cups tightly packed baby spinach leaves 
  •  1 tub (270 g) Philadelphia Herb & Garlic Cooking Creme
  •   2 Tbsp. toasted pine nuts
And if you want to do the same thing we did (swap the spinach for brocolli) the website recommends this variation:

  • Substitute 2 cups small broccoli florets for the peppers and spinach, adding the broccoli to the cooking water for the last 2 min. of the pasta cooking time.
We chose to keep the peppers in though - we both love peppers!

Here is how Kraft Foods / Kraft Canada suggests you bring it all together:
  1. Cook pasta as directed on package, omitting salt. 
  2. Meanwhile, heat oil in large nonstick skillet on medium-high heat. Add chicken; cook and stir 5 to 7 min. or until done. Stir in peppers and spinach; cook 2 min., stirring frequently. Add Cooking Creme; cook and stir 2 to 3 min. or until heated through. 
  3. Drain pasta, reserving 1/3 cup cooking water. Gradually add reserved water to sauce mixture until desired consistency is reached. Add pasta; mix lightly. Top with pine nuts. Serve immediately.

This was a very easy recipe and I loved the added crunch and flavor that the toasted pine nuts added. I am sure that we will be adding this to our regular recipe rotation.

Give this recipe a try when you need a mix up your regular weeknight chicken dish.

Bon appetite & enjoy!
 

Tuesday, December 4, 2012

Pomegranate Jewel Cake


Photo Credit: Lisa Buchanan
Almost every Tuesday at United Way the lovely ladies on our annual campaign team coordinate bringing a cake or a tasty bakery goody to the office for us all to enjoy. Sometimes they are homemade and sometimes they are store bought.

A few weeks ago one of the members of our team, Lisa, made a Pomegranate Jewel Cake and brought it in for all of us to enjoy. The recipe below was passed onto my from Lisa and the photos are hers as well. This was definitely a tasty treat! Bon appetite & enjoy!

Pomegranate Jewel Cake
(Nigella Lawson, Feast) [Comments in square brackets are Lisa’s]

For the cake:
  • 8 eggs (separated)
  • 300g ground almonds
  • 1 pinch salt
  • 300g caster sugar [1.5 cups] [Remember: this is a weight measure converted to volume, so it will be different if you use regular granulated sugar.  Caster sugar (not to be confused with icing sugar) is easy to find; Redpath calls it "Instant Dissolving Sugar"]
  • zest 1 lemon
  • zest 1 orange
To finish:
  • 2 pomegranates [or 1 pomegranate + ½ cup pomegranate juice]
  1. Preheat the oven to gas mark 4/180C [350F].  Grease and line a 23cm spring form pan.
  2. Separate the eggs, putting the white into a large grease-free bowl, and the yolks into a separate bowl.  Whisk the egg whites with a pinch of salt until they are stiff but not dry and then whisk in 100g of sugar before putting them to one side. 
  3. Add the remaining 200g sugar and zest to the yolks and beat until the mixture is light and dry, then beat in the ground almonds.  This will be very thick and heavy, so lighten it with a good dollop of whisked egg whites before folding the rest of them into the mortar-thick, yellow almond mixture: it is easiest to fold in the remaining egg whites in thirds.  You need to work firmly, but gently, so everything is well combined without the mixture losing its air. 
  4. Pour into the lined and greased tin and bake for about 40 minutes, though check at 30 as you don't want this to scorch.  If the cake is brown enough, while still gooey in the middle, loosely cover with a sheet of foil. 
  5. As soon as the cake comes out of the oven, juice one of the pomegranates [or use 1/2 cup bottled pomegranate juice; juicing those suckers is messy business] and pour the juice over the cake while it is still hot and in its tin.  Let the cake cool and absorb the pomegranate juice and leave until cold before unspringing from the tin.  Place the cake on a stand or plate, and then cut the other pomegranate in half and bash out the seeds over the cake [again, the bashing is messy, so I do my usual tidy seeding method and sprinkle the seeds over the cake.] 
Photo Credit: Lisa Buchanan

Sunday, December 2, 2012

Fettuccine Alfredo

Now that we are into the colder fall months (and nearing the freezing winter months) I enjoy creamy comfort foods even more. And it is always a plus that Steve loves Fettuccine Alfredo!

In the beginning of November, Steve and I were looking through the Cook with Campbell's website and came across their recipe for Fettuccine Alfredo - so naturally we had to try it.

The recipe is very simple and only has a few ingredients - always a good thing for us when we are coming home late from work and have only a little bit of time to make a tasty supper.

Here are the ingredients that their website suggests:
  • 9 oz (255 g) fettuccine
  • 1/4 cup (60 mL) white wine
  • 1/2 tsp (2mL) cracked black pepper
  • 1 carton (480 mL) Cambell's Stock First Cream stock
  • 1 tsp (5mL) fresh parsley, chopped
  • 1/4 cup (60mL) grated Parmesan cheese
And here is how they suggest you bring it all together:
  1. Cook fettuccine according to instructions on box, set aside.
  2. Simmer wine and cracked black pepper in a medium size saucepan over medium-high heat until reduced by half.
  3. Add stock and simmer for 4-5 minutes.
  4. Add cooked and drain noodles, chopped parsley and Parmesan cheese and stir to coat noodles completely.
  5. Serve in a warm serving bowl or on pasta plates.
This was a very tasty dish and did serve very well with white wine (given that you need wine for the recipe, you may as well have the rest while you're eating your labour of love!). We chose to use Avondale Sky's Bin 17 - a great Nova Scotian white wine!

To see this recipe online visit the Cook with Campell's site.

Bon appetite & enjoy!

Thursday, November 15, 2012

Warm Delicious Gingerbread

Chunky Beef Noodle Soup + Bin 45
A few weeks ago on a Sunday evening, after making the Chunky Beef Noodle Soup for the second time (still very delicious!) with an equally delicious bottle of Bin 45 from Avondale Sky winery, we decided to try our hand at making gingerbread (neither one of us had made it before).

The recipe we chose was from the 'Grandma's Best Recipes - Traditional comfort food just like Grandma used to make' book. This was the first time that we were trying a recipe from this book and it was a great first success!

Here are the ingredients that the cookbook calls for:
  •  3-3/4 cups all-purpose flour
  • 1 tbsp baking powder
  • 1 tsp baking soda
  • 1 tbsp ground ginger
  • 3/4 cup unsalted butter
  • 3/4 cup brown sugar
  • 3/4 cup molasses
  • 3/4 cup maple syrup or corn syrup
  • 1 egg, beaten
  • 1 cup milk

And here is how the cookbook recommends that you bring all of those ingredients together:
  1.  Line a 9 inch / 23 cm square cake pan, 2 inches / 5 cm deep, with wax or parchment paper
  2. Preheat the oven to 325 F / 160 C
  3. Sift the flour, baking powder, baking soda, and ground ginger into a large mixing bowl
  4. Place the butter, brown sugar, molasses and maple syrup in a medium saucepan and heat over low heat until the butter had melted and the sugar has dissolved. Set aside to cool briefly
  5. Mix the beaten egg with the milk and add to the cooled syrup mixture
  6. Add the liquid ingredients to the dry ingredients and beat well using a wooden spoon until the mixture is smooth and glossy
  7. Pour the mixture into the prepared pan and bake in the center of the oven for 1-1/2 hours until well risen and just firm to the touch. This makes a lovely sticky gingerbread, but if you like a firmer cake cook for an additional 15 minutes
  8. Remove the from oven and allow the cake to cool in the pan on a wire rack. When cooled, remove the cake from the pan with the wax paper. To store, wrap tin foil and place in an airtight container for up to one week to allow the flavors to develop
  9. Cut into wedges and serve as an afternoon snack or with cream for dessert. Drizzling some warmed maple syrup on the top is an added extravagance
And the 'Grandma's Tip' that is shared is:
  • A very moist gingerbread is a delight. It can be made even better by mixing in 2 ounces / 55 grams of chopped preserved ginger just before turning the batter into the pan

This recipe was perfect and delicious! It did make a whole cake pan full though - so we were able to share with it friends and family. This is a recipe that I think I will try again near the holidays.

Give this one a try when you're looking for a dessert or snack that will give you that 'warm hug'.

Bon appetite and enjoy!

Recipe is from:
Grandma's Best Recipes
Parragon Books Ltd. - UK. 2007
Gingerbread, Page 194

Monday, November 12, 2012

Simple Pepper Slicing Practice

I love learning new techniques and tricks to improve my cooking skills (and of course to speed up certain tasks in the kitchen). One of the tasks in the kitchen that I find is tedious, but I do enjoy, is cutting/chopping/dicing/slicing vegetables.

The other day I was watching the Food Network when I heard that the host would be showing a great tip on how to quickly chop up a green pepper - so of course I was intrigued and my eyes were glued to the screen. And of course it was a great tip!

Here are the steps:

1. Cut the 'top' and 'bottom' off of your green pepper
2. Stand the pepper on one end and cut the pepper down one side


3. Slide the knife along the inside of the pepper to remove the seeds and core


4. Cut the pepper in half or smaller more manageable sections
5. Cut pepper into julienne slices and then cut bunches of julienne slices (dice)


I also found this handy YouTube video of the whole process as well (as soon as I finished typing up my notes of course!).

If you are not already preparing your green peppers this way I suggest you give it a try - it works every time!

Bon appetite and enjoy!

Sunday, October 28, 2012

Mini-Salmon Cakes

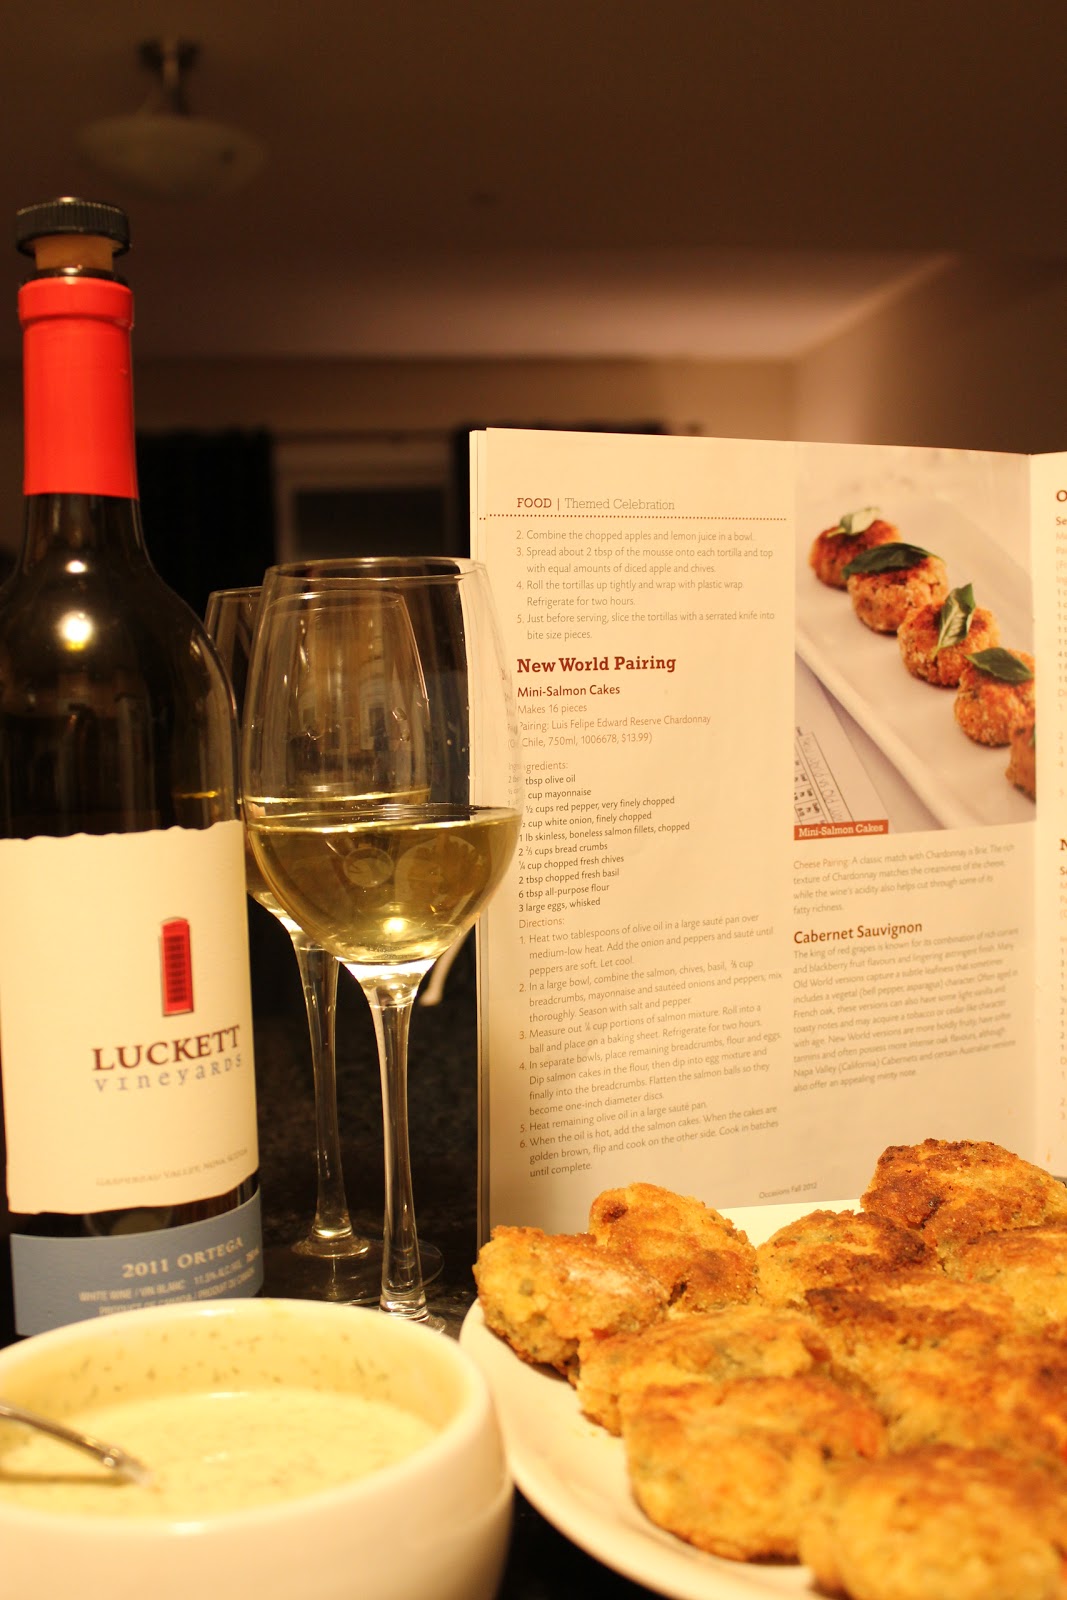
As you have probably come to understand, I like to get my recipes from a variety of sources - but I do like to try ones from local publications such as the Inspired magazine that I can pick up at my Sobeys. I also like to browse through the NSLC's Occasions magazine from time to time, but this was the first time I actually wanted to roll up my sleeves and try one of their recipes.

A few days ago Steve and I decided that we would try out the mini-salmon cakes recipes. When we looked through the recipe we noticed that it was not too complicated but it would take a bit of time (there is a two hour block of time where the salmon cakes must be placed in the refrigerator before you can continue to the next step). So we decided to give it a try and to open a delicious bottle of wine to help with the 'waiting'.

Here are the ingredients that you will need for this recipes:
  • 2 tbsp olive oil
  • 1/2 cup mayonnaise
  • 1 1/2 cups red pepper, very finely chopped
  • 1/2 cup white onion, finely chopped
  • 1 lb skinless, boneless salmon fillets, chopped
  • 2 2/3 cups bread crumbs
  • 1/4 cup chopped fresh chives
  • 2 tbsp chopped fresh basil
  • 6 tbsp all-purpose flour
  • 3 large eggs, whisked
And here is how you will bring it all together:
  1.  Heat two tablespoons of olive oil in a large saute pan over medium-low heat. Add the onion and peppers and saute until peppers are soft. Let cool.
  2.  In a large bowl, combine the salmon, chives, basil 2/3 cup bread crumbs, mayonnaise and sauteed onions and peppers; mix thoroughly. Season with salt and pepper.
  3. Measure out 1/6 cup portions of salmon mixture. Roll into a ball and place on a baking sheet. Refrigerate for two hours.
  4. In separate bowls, place remaining bread crumbs, flour and eggs. Dip salmon cakes in the flour, the dip into egg mixture and finally into the bread crumbs. Flatten the salmon balls o they become one-inch diameter discs.
  5. Heat remaining olive oil in large saute pan.
  6. When the oil is hot, add the salmon cakes. When the cakes are golden brown, flip and cook on the other side. Cook in batches until complete.
This dish is absolutely amazing! I am a modest person, but I felt that this dish was delicious enough to be served in some of Halifax's best restaurants. I cannot wait to make it again!

To add to this tasty dish Steve and I decided to make a delicious dill sauce (we usually make this just when we are having salmon for supper). Here are the ingredients and recipe for the dill sauce:
  • 1/2 cup light sour cream
  • 2 tablespoons pure maple syrup
  • 1 tablespoon Dijon mustard
  • 1 tablespoon lemon juice
  • 1 tablespoon minced fresh dill
  • 1 teaspoon grated lemon zest
  • 1/2 teaspoon each salt and pepper
  1. In a small bowl, whisk together sour cream, maple syrup, mustard, lemon juice, dill, lemon zest and salt and pepper. Serve cold.
I should also share the the wine we chose to pair the mini-salmon cakes with was from Luckett Vineyards. In early October Steve and I visited six wineries in Nova Scotia's valley (i.e. wine country) and picked up lots of new wines to try. One of our favorite new wineries was Luckett Vineyards - we were even lucky enough to have Pete Luckett himself do our wine tasting! The wine that we paired with this dish was Luckett's 2011 Ortega - Pete himself told us it would be great with seafood and he was definitely right in his suggestion!

Give this one a try when you have some extra time on your hands, or need to impress family and friends that are coming over for dinner.

Bon appetite and enjoy!